
DECEMBER - Hosted by Lesley French


NOVEMBER - Hosted by Di Hasthorpe


OCTOBER - Hosted by Wendy O'Keeffe
Hello everyone, this month's challenge really inspired me as a couple of Christmas' ago my girls got out in our backyard and splashed around to their hearts content and the colour swatch in the inspiration this month matches the colour of their swimming togs. This got me thinking about how it can be hard to get colours to match and link through out your layout so thought I would share how I use paint to link photos, paper and embellishments together to create a cohesive layout.
To start I chose my colours, pink, blue and yellow. I wanted to add a Xmas theme but it is hard to find any in these colours so I broke out my Cuttlebug and found my Christmas tree.

I painted the raised side of the embossing folder and laid down some white cardstock. Now you do need to do this quickly as the Tim Holtz Distress Paints dry permanently if left too long!
I then cut out the tree, distressed the edges to soften and added some bling.

To extend the colour scheme on the paper I edged the patterned paper with the 'Picked Raspberry' and added some 'Wild Honey' splatter (in an effort to mimic the splashes of the water)

For the embellishments I painted the 'WOW' and the letters of my title in the 'Broken China'. I have some of the Tim Holtz Word Bands so I painted it pink then wiped it off so just the words stayed pink.


It's a simple layout but I hope that the techniques I have shown you will inspire to try using paint to help create a colour scheme that suits your needs.
Hi everyone!
For my 3T's this month, I've continued the 'doodling' theme and have created some card fronts to be used on cards. I've used stamps, Archival Ink, Distress Inks and Ulta-fine Sharpies. The paper they're made from is a laser colour copy paper, which is really a light card weight. This has a low sheen and takes stamping and colouring with various types of inks really well.
For my 3T's this month, I've continued the 'doodling' theme and have created some card fronts to be used on cards. I've used stamps, Archival Ink, Distress Inks and Ulta-fine Sharpies. The paper they're made from is a laser colour copy paper, which is really a light card weight. This has a low sheen and takes stamping and colouring with various types of inks really well.
With all of the card fronts I'm showing today, I've stamped the design, drawn a frame roughly the shape of the stamped image around it, and then drawn rays from the frame to the edge of the card. Mine are freehand, but you could rule them or have a different shaped ray.. curved, wavy, zig-zagged.
Card 1.


This was designed to be a masculine card. I've also looked at some of the elements of the stamp design; circles, curved lines and triangular shapes, and have used some of these to create patterns.
Card 2.

With this card I have coloured with Distress Inks first.
Card 3.

With this one, I have coloured sections of the stamp image with ultra fine sharpies.
TIPS
If you wish, you can lightly pencil in the designs until you're satisfied and then go over them with the black pen. Any pencil marks can then be erased.
If you do a design that you don't like the look of when you are finished, take a piece of the same copy paper, cut a section from it to fit over the design you don't want, adhere and redo with a different design.
When putting the designs together I try to have some areas lighter than others. This is regulated by the amount of blocking in I decide to do with the black pen.
You don't have to stick to black. Any colour can be used, even white, gold or silver on black card.
This type of doodling is not restricted to cards or ATC's. Next week, my post will show how I've used it for the background on a layout.
I hope this gave you some ideas. Have fun if you decide to try it.
Cheers, Di
OCTOBER - Hosted by Wendy O'Keeffe
HYBRID VINTAGE CARD
Next week you will see the vintage layout I did using the beautiful painting by Godfrey Rivers “Under the Jacaranda Tree” as inspiration. In the meantime, I thought I would show you how I used the same artwork as inspiration to make a card. The card is a hybrid, using both digital and traditional elements. This is the finished version:

It is an easel style card, traditionally made but with a digital front panel. The main colour is blue to reflect the lovely colour of the Jacaranda blooms in the inspirational painting. The following step by step instructions show how I made the card.
1. The front panel

I produced the front panel of my card by using digital artwork and printing it on photographic paper.
Hint 1 - Don’t be put off if you don’t do digital. You can use one of your own photos, or a favourite image from the internet (just make sure you don’t break any Copy Right laws).
Hint 2 - If you don’t have a photo printer, you can save your image and have it printed as a photo for as little as 10 cents at places like Office Works. (I do this for my Christmas cards and they end up being very inexpensive but still personalised.
The vintage image on my panel is from G&T Designs which I purchased from e-scape and scrap online. The other embellishments come from a variety of digital art packages.
2. What you will need to make the card

As well as the above list, you will need your favourite glue and some foam dots or squares.
3. Assembling the card

Ink around the edges of your front panel and the two pieces of patterned paper/cardstock. Stick the front panel to the large piece of patterned paper so that it looks like this.
Then stick that to the centre of one of the pieces of your scored cardstock so that it looks like the photo below. This could be a stand-alone card as it is but I’m going to show you how to turn it into an easel card.

To form the easel shape, you need to stick your card to the other piece of cardstock.

Now you can stick your embellishments to the front of your card so that it becomes 3D. I used flowers and a butterfly as an extension to the flowers on my digital panel.
You should still have a small piece of patterned paper/cardstock left which you need to stick on the inside, bottom-centre of your card. I used foam dots to stick this on – this raises it so it acts like a platform for the card to stand up properly.

I only added a couple of embellishments to the front patterned platform. You can embellish the whole panel to make your card more ornate if you like. However, I’ve left mine fairly plain so that the sentiment can be written on the panel and easily visible for people to read.
Thank you so much for dropping by and I hope you learned something that you can use for inspiration next time you want to make a card.
SEPTEMBER - hosted by Julie Short
Sharing My Secrets!
Hello it's Julie here sharing my tips and techniques for September.
I have my hand up as I am a fully paid up member of the FIBRE A'HOLICS CLUB! I cannot walk past the wool and fibres section in a store without stopping to look. And buy!

Thin braids are used as outlines on this layout
I inherited a BIG stash of sewing cottons from my mum who was a seamstress. I think she was the President of the club for a long time!
These cotton have become my "go to" for making some of the braids that I create for Time To Create Handmade.
Here's How I make Sewn Braids!

I take a selection of these sewing cottons -the number determines the thickness.

I set my machine up. I like black thread in top and bottom. Any colour will work! The machine is set to Zig Zag and the stitch length and density is determined by what works for your machine.

To achieve consistent tension I hold my hands like I have shown and I concentrate! I usually make 1 bobbin length at a time. Sounds a lot but when you start to use these braids you will find many uses for them.

The colour combinations are only limited by your fibre collection!

When you are comfortable with the cotton braids you can get much fancier. Here I made a braid with string and crochet cotton.
WARNING -- Be very careful and clean out the bobbin area after each braid. A lot of lint is created so you will also need to oil your machine more than you usually do!

As you play you will discover that you can build wider braids. The strings can wobble about and you can get really interesting effects.

I have made long detailed pieces that I use as totally unique scarves. I'm usually asked what my scarves are made from!

Adding these braids to clothing is also fun. They are totally washable and can revamp clothing in a quick and interesting way.
I do hope you try making some of these braids. Be WARNED though, the fibre journey is an exciting and addictive one that will have you experimenting.
Julie
AUGUST - hosted by Deb Kupfer
Using fabric on a layout
Hi everyone, Deb here. With the criteria, for this month, being “fabric”, I was keen to add some machine stitching to my layout as well as create some fabric embellishments.
So being inspired by the 3 main colours in the artwork, here is how I created my page……
Starting with a plain piece of card stock, I randomly stitched rows down and across the page, starting and stopping at different points, to form some “squares”. You can draw these lines in before stitching if you prefer your lines to be straight. Then sew 2 rows around the edge to form a border.
I find the longest stitch on my machine works best.

Next, rough up the stitching by running a sanding block along it. I sanded more lightly around my border so as not to take as much of the stitching off. I then added some drips of ink and put it aside to dry.

and a close up…..

Using scraps of fabric and some vliesofix (this is a double sided webbing with a paper backing used in appliqué), I ironed the vliesofix onto the back of the fabric, (rough side down - paper side up.) You can now trace or draw some little embellies onto the paper side and cut them out . (I like to keep the drawings/tracings simple as you are tracing them on the paper backing which is the underside of the fabric and you need to be careful they don’t end up in reverse). I also ran some of my fabric with the vliesofix attached, through the Big Shot.

Now it’s time to decide where your photos will go, although don’t stick them down just yet as you will need to iron the fabric embellies on your page first. I didn’t know what photo/s I was going to use when I started, so I changed them to black and white and printed them out in a smaller size to suit my page.
It doesn’t matter if your photo/s don't it in a “square” - just put it over two or 3. I marked where the photos would go with an X.
I then peeled the backing paper off the vliesofix , positioned my fabric embellies on the page and ironed them on.

After I had ironed them on, I stuck down my photos and then gathered up some bits and pieces that I thought might be suitable to fill in the other squares - stamps, flowers, rub-ons, washi, buttons, transparencies etc (you probably won’t use them all). Now just start filling in the “squares” - no need to fill them all in. Don’t forget to leave room for your title and journaling. I’ve added some doodling and outlining of the embellies and I’ve inked in black around my border as well.

and my finished page ...

JULY - hosted by Maja Stokk
Mixed Media Layout
Hi, Maja here today =). It´s my turn to inspire you ARTastic readers. First I thought about showing a special technique, but decided to show you step by step how I made my inspiration layout for the July challenge.
Hope you want to join me through my pictures =) So lets begin!

I guess I might be a bit odd, but I start with the flowers. So I chose my flowers, my pic and then some pp to go with this month challenge. Then I added the mediums I wanted to use and last a couple of stencils to go with the mediums.

I start with the background. Use my stencils and two different colors of Gelatos. I smear out the Gelatos with some water. I use my fingers for that work ;). When it´s done and it has dried I take some Shimmeriz texture paint and use it with one of my stencils. Let it dry! or use a heater =) then I used some black India ink and Distress Ink in the color Barn Door. I just let some ink drop in the page here and there and then use a straw and blow on the wet ink.

Now it´s time to use some stamps. For this layout I took my circle stitched stamps from Prima. I stamped so that the circles went from one side to the other on the background paper. Then I started to distress my paper edges and went over the edges with some Distress Ink in the color Barn Door.

When I have come this far it´s time to let the real fun begin =). I put everything, papers, photo and embellishment on the background paper, without glueing it down, to see that my design works. This process can take a while, any of you that are like me, moving things around on the page like forever! But this was the way I chose to put my embellishment and papers.... and realised that the bottom right corner looked empty, so I had to use my Gelatos, stencils and Inks a little more. The last thing I did was to write my journaling on paper stripes and put it on the page.
And this is how the page turned out!

JUNE - hosted by Aubrie Wancata
Bleeding Art Tissue
This tutorial will show you a few techniques with a really versatile material, bleeding art paper. It is like tissue you stuff in a gift bag, but when it gets wet, the color bleeds all over the place. I will show you three different uses.
1. Here is some bleeding art tissue. You will also need a sprayer for water, thick paper, matte gel, and optional liquid frisket.

First way to use the bleeding art tissue:
2 . First use liquid frisket to mask off any areas you don't want ink going. Frisket is great. It is like a liquid rubber that will go on similar to paint and then peel off once the ink is dry, leaving the plain surface underneath.

3. Spread frisket on with a sponge.

4. Once frisket dries, rip bleeding art paper into pieces. Then, spritz the paper with water, and lay the pieces down. Also, spritz some water on top.

5. You can then use a heat gun to dry the water, or leave it overnight depending on what you need to do. But when you peel off the paper it leaves a nice watercolor effect.

Second way to use the bleeding art tissue:
6. You can also apply bleeding art paper with gel medium. I like to do it over top a graphic paper because it is somewhat translucent.

7. I ripped long strips here so that it would look like grassy hills.

8. Apply the gel medium to the base paper, then, place the bleeding art tissue on top. As you do it, you want to crunch it up a bit so that it creates texture. Keep putting gel medium in places you need to adhere the tissue.

9. Once it dries, use some ink rubbed on to emphasize the texture. You can also use something like InkaGold. Whatever will rub on and pick up the wrinkles.

10. Here's how it looks when it is done.

Third way to use the bleeding art tissue:
11. Finally, peel off liquid frisket to reveal the paper below. Here I didn't want the blue going into the sun. So, I masked it off.

12. Paint with gel medium over the area you want to pick up color. This time, you place the bleeding art tissue down but you do not let it dry. Don't wait too long or it will be stuck to the paper! I like to crinkle the paper so that there are white "veins" left without color.

13. Here is what the finish product looks like. I used this third method on the sun.

14. And here is how all three look together.

MAY - hosted by Helene Bogren
Mixed Media Flowers
We all have different scrap styles and when I saw this month challenge I realized I have not used flowers for ages. Of course I could show you a tutorial on how to make a homemade flower anyway, but I thought I might not be the only one, so I chose to make a tutorial on how to make simple “mixed media flowers” instead. These flowers were really easy to make.
First I stamped some flowers on my background. Make sure to use water proof ink.

Then I colored them with water color, which is my favorite mixed media product at the moment. Water colors give your layout a soft feeling even if you use colorful shades. They are also transparent so a patterned background paper can shine through.


The last step was to decorate the page. Personally I prefer a more “rough” look and I use stamps and washi tape to create that. In order to let the flowers play the main role I only used three embellishments this time.

Here is the final result ...

APRIL - hosted by Debi Clark
My Tip is a very simple one, and that is ... Get Your Punches Out!
 I cannot throw out offcuts of any glorious scrapbooking paper,
so with the smaller pieces I get out my punches and make a heap of shapes that you can journal on, add as an embellishment, make into a flower – limitless really!
They are all ready for a page, or a card, or an album. Alternately just trim up your pp into squares/rectangles/triangles and then they are all ready for a page, or a card, or an album.
My Trick is again another simple one ... just stick it down, how you like it!
Make your layout or card or canvas, just for you because if you are happy with your project, then it might be one to give away! I know the recipient will be happy too! Yes, make it just how you’d like it for you!
My Technique is also quite simple and it is one that I have used for a few years and relates to my tip … using those paper off cuts in a journal.
My daughter bought me a La-De-Dah album made by Grant Studio’s (available at Big W or Kmart for Aussie gals), for Christmas, and it is lovely to use this and it is just for me, again! Previously I have just used generic A5 notebooks.
 My truly messy desk works well for me …
I find amazing things hiding on there!
 Here you can see the cover, and I then added my embellies ... including a photo of little me.

I adhered the punched/cut shapes along with some Kaisercraft or Basic Grey journal tags, and embellies then used a 6 Word Memoir, for each day …just 6 words to sum up what has been going on in my life. Plus I write myself little messages.
Here is a link for some other 6 Word Memoirs you might enjoy -

I am not a Project Lifer, as such but I do have some cards which I like to use up. There are photo spots in the album so I used a card and some bits to liven it up.

And then added in some tags, embellishments and punched circles.
Hope you have enjoyed this little read ... happy scrappin'!
Debi
MARCH - hosted by Elaine Schoof
Using chipboard on your Layouts
Raw chipboard looks great on layouts but I also love to alter them. I am going to show you how I altered this chipboard tree for a layout I did.

The materials I have used for dressing up this chipboard tree is gesso paint, ink, stamp and buttons.

Firstly paint your chipboard with gesso. It's up to you if you do one or two coats. Here I have done one coat which makes it a duller white and also the paint strokes are more obvious.

Once the gesso is dry, stamp over top. I have used a script stamp but any background type stamp works and looks great. To add some dimension I added buttons on random
holes of the tree. To make it more interesting I have used twine with the buttons, one as a knot and the other as a bow. For the other buttons I have used cotton string. Using buttons
allows you to add colours from your layout to your chipboard, tying it in together.

For my layout I have also used chipboard butterflies. To make these, you glue the raw butterflies to the back of pattern paper. Once it's dry cut around the butterfly and sand down the edges with sandpaper to smooth down the edges. It also can add a small white edge to your butterfly. Add stick on crystals for a bit of bling. This method works well on solid chipboard shapes.

Here is my finished layout using my chipboard tree and butterflies. Two butterflies I left raw and sponged some brown ink on the edges, just to soften them up.
TIP- if you use chipboard shapes that presses out of surrounding chipboard, you can use the negative as a mask for texture paint or misting as I have done here.

FEBRUARY - hosted by Tone-Lill Angelskar
A mixed media background
Let's get started by gathering your products together. Here is what I used.

Products : Spray Ink and Ink pads,
Mini mister, gesso, Glue and Seal,
Black crackle paint, stencils.
My Tip before you start using the ink, is to add glue and seal in a thin layer onto the cardstock to avoid the ink "running" into the paper when using stencils.
Here are two of my tricks to create different patterns on the back ground cardstock ...

Dab the ink pad onto a Teflon craft sheet, spray with water using mini mister (or a regular spray bottle) until you see droplets in the ink. Carefully spread the cardstock paper you have previously coated with the glue and seal, on top to get the impression of the ink onto the card. Dry with heat tool before adding a new layer of ink.
Before starting with a new colour, wipe the Teflon stain resistant craft sheet clean.

Here I sprayed with black ink straight on to the stain resistant sheet and added water with the mister. I then created a spiral pattern with a craft tool like a ice lolly wood stick.
Like above, I spread the cardstock on top to create a new pattern on top of the blue pattern print.
Remember to let it dry or use a heat tool.

This is what it looks like when dry.

I did the same with red, and created a squiggly pattern.
When I had dried the red pattern on the cardstock I added black crackle paint using the Prima " crackle" stencil and dried it with a heat tool.

I added, the last stencil with the leaf pattern using white gesso and blue ink spray, which gives lovely different shades of blue in the pattern.
....and here is the end result creating a background on the card stock.
Tip: Use Glue and Seal on cardstock before you start with the ink. Remember to dry completely.
Trick: The trick is to be "light handed" when spreading the card stock onto the different patterns of wet ink on the stain resistance craft sheet.
Techniques: I have only showed you a few ways to use ink .
There are no limits of techniques you can use to create different patterns using spray or ink pads. Just be creative and have fun! :)
Finally, my finished layout after adding the photo and my bits and bobs....

..And the last my tip, I used the red Tattered Angels Glimmermist to colour the gauze/cheesecloth, and a few light sprays with "Glacier" colour Glimmermist over the page as a finishing touch :)
JANUARY - hosted by Jane Howden
Using Gelato's to create a background
I'm starting things off and showing you how I put together the background for my layout this month. Santa was very kind this Christmas and brought me a couple of packets of Faber and Castell Gelato's which have been on my wish list for quite a while and I have been playing around with them trying a few different methods to create different looks on my pages.

For this layout I started off with a 12x12 Kaisercraft stencil. I used some repositionable tape runner in a couple of spots on the back of the stencil to hold it in place on the white cardstock while I used the gelatos.

I started off using the blue down the left side - lightly running the stick into a few of the holes. I then took my blending tool (you could also use a sponge or even a tissue) and in a circular motion blended the gelato. Moving in a circle helps spread the crayon evenly and it does not then leave obvious lines.

Once I was happy with the blue I moved onto using the purple and went over a few of the blue slots as well as continuing down and across the page and then blended this in the same way as I had done the blue.

I next used the pink, again covering a few of the purple slots but also extending the design further down the page and to the right.
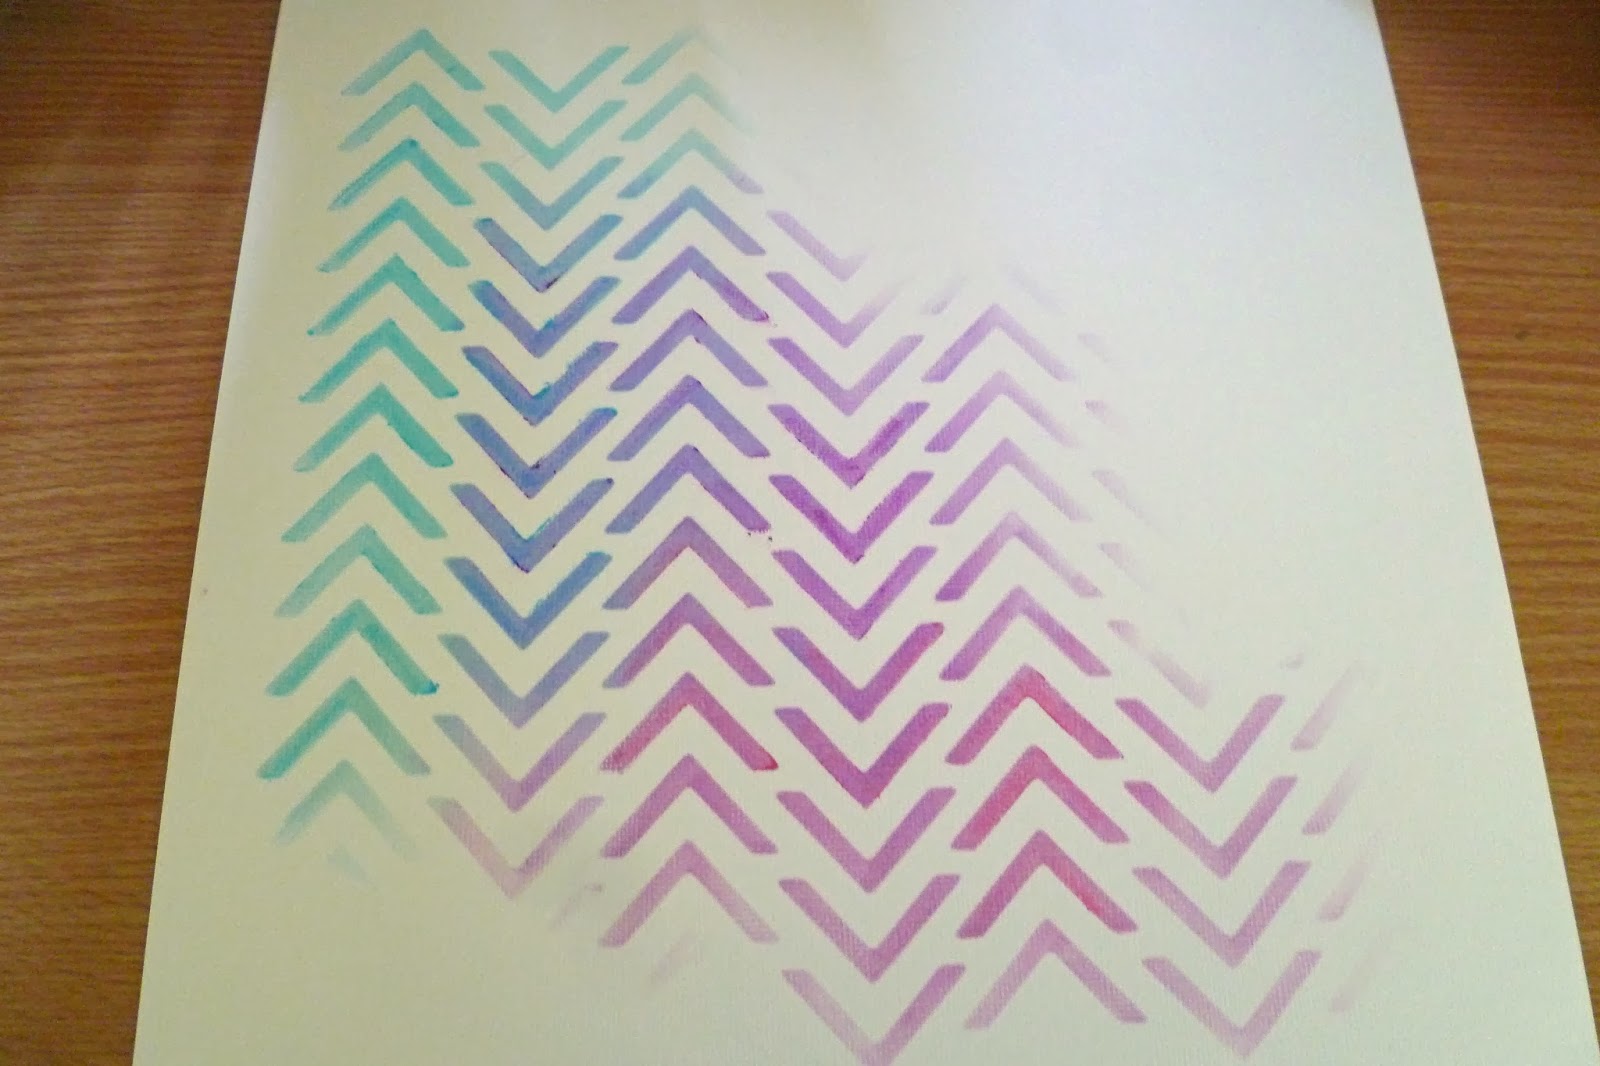
My finished background. TIP - it is easy to remove the stencil for a quick look at the result of each stage and then replace over the design to continue your work.
No comments:
Post a Comment